Elissahearts - Treasures From Scrap Clay!
By Elissa Powell
Visit Elissa's Photopoint Site
(To skip directly to the pictures and instructions, click here)

For
the past four years, polymer clay has led me on a fantastic adventure
of joy and discovery. When I first started, I pretty much stuck to
making cane-slice beads. My scrap pile seemed to grow amazingly fast.
What to do with all this good scrap clay? I cut off a chunk to ponder.
As I pulled the slice open, I was stunned by the beauty of the mirror
image produced by the cut surfaces! I knew then that I had to think of
a way to incorporate this enchanting symmetry into my work. As a
lifelong heart lover, it wasn't long before I put two and two together!
Over time, my hearts have evolved. I
use many different techniques for making hearts, but my symmetrical
Elissaheart method will always have a place in my own heart (in
addition to being a most interesting and profitable way to use scrap
clay!).
The original flat Elissahearts
assembled with random chunks of clay have given way to a more planned,
predictable method, employing some of the basic rules for artistic
composition. The important ones are listed here:
- Contrast: When assembling pieces, place light clay adjacent to dark clay, busy areas next to open areas.
- Focal Point: As in any artistic composition, a focal point or
center of interest is important to entertain the eye. A splash of
unexpected color or texture will do that. An area of translucent
patterned clay can give the illusion of depth.
- Composition: Components need to relate to each other in a
pleasing way. Twisting the ball of clay, or cutting into smaller pieces
and recombining can accomplish this. You will need to experiment.
- Molding: Molding the hearts gives them a rounded, voluptuous
beauty. My mold is made of scrap clay from a master I sculpted myself.
You can make your own, or you can buy one ready-made from a craft
store.
Directions: Following the
step-by-step directions in the pictorial section will take you through
the heart making process. These few extra pointers will assure an
awesome result!
- The pattern variations in one
little ball of clay are infinite! Don't settle for a result that's less
than stunning! If you are not happy with the first pattern you see,
close the ball, reshape, and cut again.
- A simple way to remove a stuck heart from a mold without
distorting it is with lung power! A quick puff directed right at where
the clay meets the edge of the mold usually will cause the clay to
release.
- After curing the hearts in the usual way - 25 minutes at 265
degrees for Fimo or at 275 degrees for Scupley Premo - the real work
begins: sanding, buffing, and glazing. The finish I swear by is Flecto
Varathane Diamond Wood Finish, available in the paint department at
most hardware stores. It bonds to the clay in a permanent rock-hard,
non-peeling finish. It is far superior to any of the craft finishes,
and ounce for ounce, only a fraction of the cost. To learn about how I
apply the Varathene to my hearts, see my article on
Varathane dipping.
- Sand sparingly, especially with the coarser grits of sandpaper.
Remember that the symmetry of these hearts exists only on the very
surface of the cuts. Excessive sanding will erode it! Most people sand
more than they need to, anyway.
And that's all there is to it! I hope you will all enjoy making hearts as much as I have. Any questions?E-mail me! Hoping everyone has a happy healthy, and heart-full Valentine's Day!
Project Instructions

Gather together a promising assortment of colorful scraps.

This is my choice of components for the demo heart. Note the selection of contrasting colors, hues, and patterns.

Strategically assembling the components - light adjacent to dark, busy patterns next to open patterns.
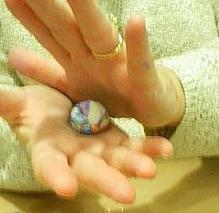
Now roll the assemblage of pieces into a smooth ball.

After
deciding on an inside pattern, shape the ball into a teardrop, flat on
two sides. I have chosen the white area to be the center pattern of my
heart.
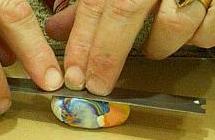
Lay
the teardrop on one of its flat sides and further flatten with the side
of the tissue blade. The teardrop should be about 3/4 inch thick now.

Now stand the teardrop on the edge that contains the intended center pattern, and slice as evenly as possible down the middle.

Open slowly to prolong the anticipation.....
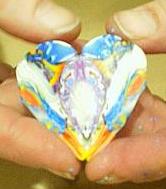
....and there it is! This time, perfection on the first try! Gently press the sides together to make them stick.

Now, with a finger coated with baby powder, smooth the seam to make it disappear.
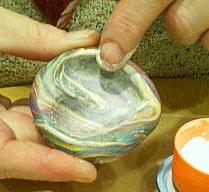
Now with finger, smooth a thin layer of baby powder over the surface of the mold.

Press the heart face down into the mold. With powdered thumb or finger, smooth the back of the heart.
Not
pictured: make an impression of the pin back you will use. Later, when
gluing, the pin back will snap into the pre-formed groove for a
tighter, more secure fit.

Now a quick slap of the hand holding the mold against the palm of the other hand should release the heart. Smooth the edges.

The raw, molded heart, in all its splendor!
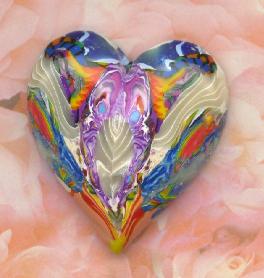
The sanded, buffed, and finished pin.
Below you can see more Elissahearts made from scrap clay. These and many more can be seen in my Photopoint album.

If you would like to submit a project to a future
POLYZINE issue, send an email to Nanette
Editor's Letter | Letters to the Editor |Technique of the Month | Book Review | syndee holt | Scumbuster | The Clay Factory | Issues in the Crafting World | Art in Transition | Rainbow Filigree Lesson | Quick Bracelet Set | Fragments | Elissahearts | Varathane Dipping | Reader's Gallery| E-mail Us! | Home