


|

This technique works for any layered
stone. In fact, it works well with any harmonious color scraps. It
works so well, in fact, that it fooled a semi-precious gemstone
dealer<G>. I call these Napoleon Beads because the
technique is one I learned when making the infamous French pastry. I
have used it for many color mixes with great success.
Materials
- About an ounce of Christmas Red Premo (equivalent to half of a 2 ounce package)
- 1/4 as much Fuschia Premo, or a little more
- 4 times as much White Premo as Christmas red
- This means
that if you start with a 1" x " cube of red Premo, you'll need 1" x 1
1/4" cube of fuschia, and a 4" x 1" cube of white. You may decide to add
a little more fuschia to make a raspberry, or slightly purple red
color, or add a little dark red to tone down the bright pink (a third to
half as much as the fuschia).
|
Tools
- Long needle or similar tool
- Baking sheet or tile
- I use a baking sheet with an accordion folded piece of brown paper.
For the most symmetrical beads, string them on a piece of steel rod
suspended on the sides of a baking pan. You can file indents into the
edges of the pan so the rods won't roll.
|
Directions - Click Pictures for a Larger View
1. Mix the red and fuschia Premo. If you don't have Christmas red, find a picture of rhodochrosite (look at firemountain.com) and mix the darkest color in the rhodochrosite. Divide the mixed red color into four equal parts.
2. Divide the white Premo into 5 equal parts. Mix 1 part white into 2 parts of the red.
3. Mix 2 parts of the white into 1 part of the red.
4. Using the remaining red and white parts, mix a very pale pink
(just a touch of red into one part of white), and a very dark pink (1/2
part white into 1 part re), and other in-between colors.

5. Roll each of the colors into a log about 4" long and lay them next to each other in no particular order.
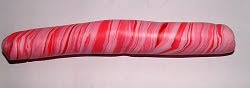 6. Twist the logs together and roll them into a longer cylinder.
Fold this in half, and repeat until the colors are in small but quite
distinct bands (right). The colors and lines will blend quite a bit
more with the next step, and you can always pick them up and re-roll and
twist again, so it's best to under-marbelize in this step.
6. Twist the logs together and roll them into a longer cylinder.
Fold this in half, and repeat until the colors are in small but quite
distinct bands (right). The colors and lines will blend quite a bit
more with the next step, and you can always pick them up and re-roll and
twist again, so it's best to under-marbelize in this step.
7. Roll into an even log about 2 or 3 times as thick as you want to make your beads.
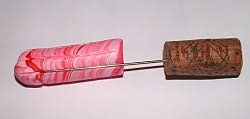
8. Cut your log into pieces about 1" shorter than your needle.
Using the side of the needle, lay it on the log lengthwise and pull the
surface of the clay towards one end of the log. Repeat this pulling in
the same direction about every half inch.

9. Turn the log in the opposite direction and pull lines between each of the lines you made in the last step.

10. Roll out the log to the thickness that you want to make your
beads. Using a ruler, cut the log to the size bead you want to make.

11. If you are going to make round beads;
(A) Gently pull up the clay on the sides of the bead near the
ends, making a point at each end so the design is continuous to the
point.
(B) Gently push on these two points to shape the bead into a 'square round'.
(C) Continue gently pushing on the square edges to form a round
ball and set the bead aside to cool. I leave the bead overnight. You
may also chill it in the refrigerator.
12. Roll the bead in the cupped part of the palms of your hands until it is perfectly round and again set it aside to 'set'.
13. Looking straight down on the bead, and twisting while you
push, push the needle through the center of the bead. Lift the bead up
on the needle and look at it from every direction to be sure it is
symmetrical. Put it on your baking setup directly, as every time you
touch it you are likely to change its symmetry. Bake according to the
package directions.
14. Future Floor Wax is a great finish for rhodofauxite as it makes it look like the finish of the real thing.
Additional Suggestions for Rhodofauxite Method for Striated Stone:
Round Beads: Insert needle through one of the areas where you
have 'pulled up' the sides. It should come out approximately through
the pulled up center on the other side of the bead. These won't show
when the bead is strung, therefore looking like the bead was carved from
stone.
 To Make a Flat Sheet: First, lay the cylinder on its side in
front of you, and using the drawing as a guide, cut the cylinder in a
spiral. Don't worry about making a continuously smooth cut as imperfect
cuts will only add to the 'real' appearance of the stone.
To Make a Flat Sheet: First, lay the cylinder on its side in
front of you, and using the drawing as a guide, cut the cylinder in a
spiral. Don't worry about making a continuously smooth cut as imperfect
cuts will only add to the 'real' appearance of the stone.
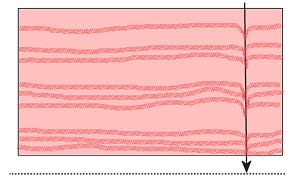 The second drawing shows how to make the "feathered" (from the Napoleon pastry) or "combed"
(from marbleizing) pattern: Lay the sheet near the edge of the table
(shown by the dotted line), with the linear pattern laying parallel to
the edge of the table. Lay your needle flat and pull the lines down as
you did with the cylinder. Make the lines close together as they will
spread when you roll the sheet flat. The lines should not be exactly
parallel or perpendicular as we are trying to create the effect of
natural stone.
The second drawing shows how to make the "feathered" (from the Napoleon pastry) or "combed"
(from marbleizing) pattern: Lay the sheet near the edge of the table
(shown by the dotted line), with the linear pattern laying parallel to
the edge of the table. Lay your needle flat and pull the lines down as
you did with the cylinder. Make the lines close together as they will
spread when you roll the sheet flat. The lines should not be exactly
parallel or perpendicular as we are trying to create the effect of
natural stone.
Turn the sheet so that the opposite side is near the edge of the table
and repeat. Roll the sheet flat (I like to use a glass roller). If it
gets too thin, roll a sheet of plain clay to use as a backing and then
roll the two together.
Susan Fadl
©2003
We'd like to thank Susan for sharing this wonderful lesson with PCC.
If you have a lesson or tutorial or project that you would like to share
with PCC, just email Leigh or Stephen and we will help you prepare your project for the PCC Website.
|



)
)
)
)
)
)
)
)
)